Thursday, October 25, 2012

Rosemary Pork with Ginger

This pork recipe is easy!
What a great combination. Rosemary and Pork...oh and the third party, Ginger. I used pork loin, which is almost always tender. It is a cut made from the top part of the rib cage. I actually bought a roast and sliced it into chops. It's cheaper this way, and I control the thickness of the cut.
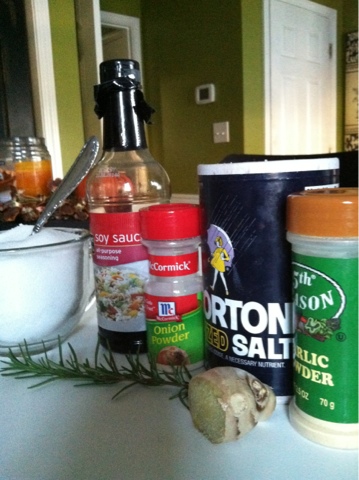
These are the ingredients I used. I didn't measure anything. Yes I am one of those people. Sorry, but I will walk you through what I basically did. I added salt, onion powder, and garlic powder. Don't judge me for using garlic powder, I was out of fresh garlic :( . So moving on.....a few sprigs of rosemary, finely chopped and fresh ginger, that I grated. Add soy sauce and a little water for the pork to cook in and sprinkle sugar over the dish before popping it in the oven. I baked it at 400 F for about 30 minutes. The sugar adds a savory, slight sweetness, which is always great with pork. I love the fresh ginger. My kitchen smelled so great while this was cooking.
Have enough of the sauce (soy, water, ginger, rosemary, garlic, salt, sugar and onion powder) to where it's not quite covering the top of the pork. Cover with foil. Now I know I didn't tell you how much of each ingredient to use, but use your own taste buds to tell you. You've used them all before....you know what you like.
Rosemary potatoes for a side. Simply cut potatoes and red onions and rosemary. Sprinkle with olive oil, salt and pepper add garlic. Mix it well so that the oil and seasonings have covered the potatoes.  I threw these in the oven uncovered, along with the pork . They cook in the same amount of time. How great is that?!
Voila! Add some green beans( the one green veggie ALL my family will eat) with this meal to finish it off. Easy and fast. Enjoy!

Mr.Owl

I wanted to create an owl all from nature. The best part about this project is it's FREE! Not to mention cute!
I had such a great response over this little guy, that i decided to put him in my blog and share him with you!
I started with a log. Cut it down til it's about 5-6 inches. He's going to be a chunky owl.
I used a jig saw to cut an angle in the front to give a "little owl" shape to his face.
Can you see him starting to come alive?
I used pine cones for his feathered chest. Just pull the layers off of the pine cone and start to hot glue from the bottom to the top. I used two different acorn "caps" for the eyes (I went back and added paint to the inner acorn, so his eyes would show up better). The fury ones I glued backwards and put the other one inside. Then I used a little disk I had cut from a limb and using scissors cut it to a quarter (slice of pie shape).
Added sticks for eyebrows (I hadn't cleaned off the extra glue yet when I took this picture...don't forget to do that). Acorn "caps" for the wings, moss for his head. Done! Hello Mr .Owl, you sure are cute! You don't have to spend a lot of money on these cute little nature critters in the stores....go make your own! Have fun, and stop by again!

Tuesday, October 23, 2012

Nature Inspirations!

My recent trip to the mountains, inspired me a lot when decorating this table. In this post I will show you three Fall candle ideas. Two were inspired by Pinterest with my added touch to make it my own! Some things I like to copy, but most of the time I want to put my spin on it so it's more unique. I used sticks I found in the woods, they already had pine cones on them....perfect! Just put them in a glass vase. Repainted an old craft pumpkin cream, painted another black with our initial, and placed it in an urn I had. Added real mini pumpkins, birds, even a succulent plant. All Nature...Love!

This tealight log idea I got from Pinterest but I added the moss and acorns for more interest. I saw moss all over logs and trees through the trail in the mountains. It was beautiful.

I added dried flowers from my yard and pine cones. I used a 1.5 Wood Boring bit in my drill to cut out the holes in the log. The tealights fit good and snug.
See how nature can inspire you? I'll just take a log and make beauty with it!

I thought this was so pretty, thus inspiring the moss on my tealight log.

This is pretty simple. The two candles on the right, I got straight from Pinterest. It was easy! You just cut an old sweater to fit your candle and hot glue it in the back. I used the sleeves and left the edge of the sleeve so I could flip it at the top. Added a real leaf with string and your done. To the left I added some burlap to a candle, some string and added a dried "thingy". Not sure what it is, but I like it.

Here's a closer view. I cut another log,  that had split, laid it on it's flat side. Again I added moss and acorns. I really like how it looks. It's a different way to display a candle, that's all from nature, but very impacting!

This is something I did last year. I wasn't bored with it this year, so I used it again. I just wrapped some awesome bark around a candle, added a satin ribbon and an adorable butterfly. You didn't know that bark could be so awesome, did you? I again hope you were inspired. Let nature teach you a thing or two about how to decorate....I did!

Thursday, October 18, 2012

Fabulous Fall!

When decorating for Fall, there are certain areas that I will make impacting. Just really fabulous! One area is my dining room table. I am a, "layer" decorator . I like to add layers and layers. Take it to the next level. There is good, there is great and there is FABULOUS! I like to land there....in certain areas of my home. I like simple in other areas. So in this post I am going to mention some of the areas to really go all out!

By adding "real life" textures to glass, artificial, or decorative pieces, it gives it a more sophisticated look. Here I just added some bark, pine cones, dried grass and items made out of grapevine.

There's the musical, papier mache' pumpkin and a crazy eyed owl! I bought him at Michael's last year, and felt so stupid standing in line to buy him. But I had to have him.

The front door is another area that should be impacting! I actually kept it simplier this year.

Remember the welcome post? Go to the archives of previous post to see how to make this. I couldn't find the cabbages I wanted for my front door pots, so I used a shrub instead! They cost the same and I can plant it in the ground during the spring. The cabbage would have just died. Don't get me wrong I love cabbages in my pots....I have other planters with them and I will show you later in a different post. I often plant for the fall with shrubs and perennials. See the pretty Coral Bells to the right of the pansies?


I love ground cover in my pots. It's a great Fall look throw in some gourds and you're done.

The mantel is another area to impact! How I made the "B" is on a previous post, go to the archives and check it out! :) I also added some logs that were different heights for a little interest. I love my "GIVE THANKS" banners. They are really easy to make.

See....layers, layers, layers! "Real life" pieces (like pine cones dried flowers and wood), glass, and artificial decorative pieces when put together looks very elegant. The topiary were two pumpkins I hated. I repainted them stacked them, then glued them to this urn I had, added berries and moss. Another free item for me, because I refurbished old stuff!

Oversized acorn, that really was a Christmas ornament. Cute little real pumpkin, pinecones (I throw them everywhere). Fake berries, real dried Hydrangeas from my yard.

I always have to throw in a bird!

In the vases I added sticks from the yard, cut out bird shapes from cardboard and covered them with print. I also added real acorns that I painted.


The banners I cut from burlap. Printed out the letters from the computer and traced them with a marker and filled them in with paint.

Here's my wreath. I combined two ideas that I liked. It turned out pretty good. Hope you were inspired. I will be sharing more ideas. They will not all be mine....I will be sharing my friends homes and recipes soon . That way you can see different styles from this blog. Everyone is different and it's great to share with one another  our ideas, to broaden our imaginations and creativity! Now go impact those areas and make it "Fabulous Fall"!

Tuesday, October 16, 2012

Rosemary Tilapia with Lentils

Rosemary Tilapia with lentils. This is such an easy dish.! Green beans sauteed with red peppers add a great color pallet. The saying "you eat with your eyes first" is true. The Tilapia over the boiled Lentils looked so bla with no color. So I decided to have a side dish that was vibrant. Not only did it look good, it tasted good! I added a slice of Everything Bread brushed with olive oil and Steak seasonings. I baked this in the oven while the fish was also being baked at 350 F.

Tilapia fish is a fresh water fish that is high in protein and low in fat. It is the most consumed fresh water fish in the U.S. Tilapia is a mild fish that flakes great in texture if you do not over cook it. About 20 minutes is all you need.

Cover it in salt, butter, garlic,  fresh rosemary and a little lemon juice. That's it!

Here are the the things I used for the Tilapia and Lentils and green beans. I boiled the dried Lentils. You don't have to soak these before cooking, they cook fast by just boiling. Add salt and onion powder to them. My kids just knew that they were not going to like them, and was surprised by how much they loved them!  Look at those crazy red peppers. I found them in my garden....I couldn't believe the plants were still producing. Corwin was so cute when I was taking a picture of the ingredients, that I decided to use this "pic". My precious lil' man. This is a simple recipe, and I hope you enjoy it. Visit again, as I will be posting more Fall decorating ideas and recipes from friends.

Monday, October 15, 2012

Pumpkins, Pumpkins, Pumpkins!

This pumpkin I made with chicken wire and papier- mache'. I was inspired by a copper metal one I saw in a store, but it was too expensive for my pocket. I molded the chicken wire into this pumpkin shape and covered it with strips of newspaper dipped in watered down Elmer's glue. Painted it with black spray paint first, then dry brushed copper craft paint over it. I allowed the black to come through so that it wasn't  one dimensional. Added upholstery nails and berries. I love it. And I didn't spend a dime because I already had everything!

These little cuties were also inspired by some I had seen on line.  I took some silk fabric swatches I had, cut them in a square. I sewed all along the edges very loosely. Holding one end of the hem, I pulled the other so that it gathered and pulled into itself forming a cup shape. Stuffed it with batting, pulled the thread again until it closed completely. The stem is wire with fabric hot glued around it. You can sew the stem to your pumpkin or glue it. I glued dried moss around the stem to cover all the areas that were not so pretty. Put them in a basket and set them on an end table. So cute.

These also were made like the others above. This time however I used rel pumpkin stems and hot glued them to the top. Even glued some dried grapevine to the stem. Cut a leaf shape out of fabric and attached again with hot glue. I love my hot glue gun! It makes life so much easier.

Now this little guy has a story. It is a real pumpkin I had decorated last year with black spray paint and  hot glued with ribbon. I left it outside all winter into the spring. It never rotted like the other pumpkins. It completely dried like a gourd. I was so glad I didn't have to throw it away.


The upper left musical note pumpkin was dollar store find. It was ugggly! A horrible bright orange. I knew I could make something of it. I added strips of sheet music to it using watered down Elmer's glue. That's it. Oh I did spray it with  coat of poly. To protect it and give it a little shine.

Now this one is a craft pumpkin from Michael's. It was orange, so I painted it black. Then I put a "B" on it with a little design around it. It was too crisp looking for me, so I scratched a little off so it looked more aged. I hope you were inspired by these pumpkins. Most of them I made last year and some longer than that. Go grab that old pumpkin you don't like anymore and refurbish it. Make it new again! Happy pumpkin creating!

Friday, October 12, 2012

"I want a new eggplant recipe!"


Remember the table of eggplants that inspired me to come up with  recipe for eggplants? Well I did....two of them!

These are so pretty.

I just used the variety you always find at any market. So here we go....

I took half of the eggplant and cut that in slithers. Then I sauteed them in a pan with olive oil, garlic and salt,  crushed red pepper flakes and ground mustard. I made a dipping sauce simply out of sour cream, salt and fresh cilantro. The pepper flakes would make the eggplant spicy so a cool dipping sauce would take the "edge" off. I just love cilantro and thought it would be a nice layering of flavors.

Voila! Slithered Eggplant with cool cilantro dip. I like it!

Moving on to the next recipe. I call this, Banana Pepper Eggplant over rice. I sliced the other half of that same eggplant into thin discs. Then I cut up a red onion, added fresh basil, dried basil, salt and pepper with banana peppers. A little olive oil, garlic, and the juice from the pickled banana peppers. Baked it at 400 F., for about 20-30 minutes. Served it over rice and I have to say I really liked this one.

I discovered that eggplant can be very spongy and will soak up the flavor that you add to it. The slithered eggplant had a garlic hot flavor. The Banana Pepper eggplant had a onion and vinaigrette flavor, which was awesome over plain, white rice.

The flavors I used for the Slivered Eggplant. The sour cream was for the dip.

What I used for the Banana Pepper Eggplant recipe. Hope you like these recipes....I like to be creative with everything I do including food! Visit again as I will be sharing a lot of Fall decorating ideas!